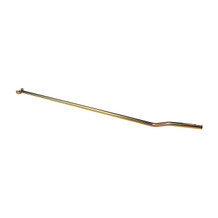
Syncro Solid SHaft

Product code: 004038
SHIPS FREE to most addresses!   4x4 SOLID SHAFT INSTALLATION GUIDE Features: CNC Machined from premium billet steel to match critical Viscous Coupler dimensions. Precision splined and hardened. B… Read more below
$399.95
Adding to cart… The item has been added
SHIPS FREE to most addresses!
 
4x4 SOLID SHAFT INSTALLATION GUIDE
Features: CNC Machined from premium billet steel to match critical Viscous Coupler dimensions. Precision splined and hardened. Black oxide coated to resist corrosion.
Rather than try to recreate an already proven process, we will forward your attention to Steve Schwenk's website where the installation steps and photos already exist for replacing the Syncro's VC The solid shaft is a direct replacement for the VC so the process is the same as if you were replacing the VC You will note the shaft has three shallow grooves on one end. This is the front end of the shaft as installed in the Syncro - the three grooves go toward the front end of the van. Do not forget to reinstall the spacer on the back end of the shaft that was there for the VC The spacer is a ring about one half inch wide and large enough to fit over the rear input shaft inside the differential tailpiece. Smearing it with heavy grease will stick it to the back of the housing and keep it from falling off as you do the installation.
Before you do the installation, try-fit the solid shaft onto both of the shafts inside of the disassembled front diff. The new splines are made tight to keep the drivetrain from clanking. You may need to work the shaft slightly to get it started, trying several different positions until you find the smoothest or easiest position.. Clean case flanges with contact cleaner or similar cleaner; use silicone gasket maker on case flanges for assembly; torque case bolts to 15 ft/lbs; apply Loctite to the driveshaft bolts on assembly.
Please note: You must have a decoupler installed or remove your driveshaft to use the solid shaft on dry pavement. Do not drive the Syncro with the solid shaft and the decoupler engaged on dry road surfaces. The shaft is designed for off-road use!
We make no representation for the shaft other than it is well machined and will physically fit in place of the VC We accept no responsibility for any damages incidental or consequential, or loss of use arising out of or in connection but not limited to, the sale, installation, use, or performance of the solid 4x4 shaft whether as a result of a defect in the product or otherwise.
Steve's website.


Additional information, please contact us.


Ref ID: VCSYNCROSOLIDSHAFT

  • Description
    SHIPS FREE to most addresses!
     
    4x4 SOLID SHAFT INSTALLATION GUIDE
    Features: CNC Machined from premium billet steel to match critical Viscous Coupler dimensions. Precision splined and hardened. Black oxide coated to resist corrosion.
    Rather than try to recreate an already proven process, we will forward your attention to Steve Schwenk's website where the installation steps and photos already exist for replacing the Syncro's VC The solid shaft is a direct replacement for the VC so the process is the same as if you were replacing the VC You will note the shaft has three shallow grooves on one end. This is the front end of the shaft as installed in the Syncro - the three grooves go toward the front end of the van. Do not forget to reinstall the spacer on the back end of the shaft that was there for the VC The spacer is a ring about one half inch wide and large enough to fit over the rear input shaft inside the differential tailpiece. Smearing it with heavy grease will stick it to the back of the housing and keep it from falling off as you do the installation.
    Before you do the installation, try-fit the solid shaft onto both of the shafts inside of the disassembled front diff. The new splines are made tight to keep the drivetrain from clanking. You may need to work the shaft slightly to get it started, trying several different positions until you find the smoothest or easiest position.. Clean case flanges with contact cleaner or similar cleaner; use silicone gasket maker on case flanges for assembly; torque case bolts to 15 ft/lbs; apply Loctite to the driveshaft bolts on assembly.
    Please note: You must have a decoupler installed or remove your driveshaft to use the solid shaft on dry pavement. Do not drive the Syncro with the solid shaft and the decoupler engaged on dry road surfaces. The shaft is designed for off-road use!
    We make no representation for the shaft other than it is well machined and will physically fit in place of the VC We accept no responsibility for any damages incidental or consequential, or loss of use arising out of or in connection but not limited to, the sale, installation, use, or performance of the solid 4x4 shaft whether as a result of a defect in the product or otherwise.
    Steve's website.


    Additional information, please contact us.


    Ref ID: VCSYNCROSOLIDSHAFT